I get lots of questions about how I was I able to create an image and my response normally is to get it right the first time. What is the first time? The first time is when you’re actually taking the photo. I place a big emphasis on this because I would much rather be shooting than sitting in front of a computer trying to “fix” something, especially if I saw the problem when I was taking the photo.
Some of the biggest problems with trying to fix a problem later are:
You may end up with a situation where you can’t satisfactorily remove something from the photo such as trash, branches, or something that just looks out of place. Just stop what you’re doing and remove it.
Trying to fix poor exposure will always degrade the quality of a file. Increasing the exposure will add noise/grain to you image. Trying to reduce exposure can result in some highlights that just can’t be recovered and will be blown out. It’s best to get it right to get it at capture.
Focus just can’t be fixed if you missed it. You can try to mask it by sharpening the areas that you wanted in focus but it’s just not the same as if you nailed it.
The amount of time you’ll spend trying to fix the same problem on multiple files really adds up and it gets tedious. Who wants to sit through hundreds of files fixing mistakes you made. You can’t batch fix all problems, especially when it comes to cloning out something unwanted since it would shift from picture to picture.
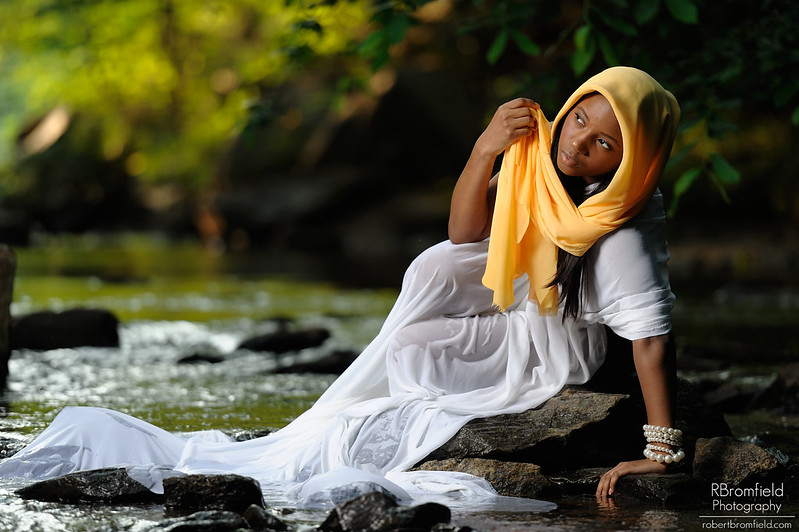
Kiya River Shoot.
Camera Model: NIKON D700
Lens: 70.0-200.0mm f/2.8 VRII
Focal Length: 200mm
Aperture: f/2.8
Exposure Time: 0.010 s (1/100)
ISO equiv: 200
Exposure Bias: none
Metering Mode: Matrix
Exposure: Manual
Exposure Mode: Manual
White Balance: Manual
Flash Fired: No
Color Space: sRGB
Photographer: Robert Bromfield
Copyright: RBromfield Photography https://robertbromfield.com
So now that we have covered “Getting it Right in Camera,” let’s take a look at shot discipline. Shot discipline is the technique that you use to create photos. Note that shot discipline takes place even before you start shooting.
Think about the type of lenses you will be using. We’ll talk about portraits in this instance. Longer focal lengths are always preferred since they have the ability to slim your subject, isolate your subject from the background, and compression effect it has people is very pleasing to the eye.
Think about the focal lengths you will be using. A wide angle lens up closes will distort and make your subject have enlarged features. I won’t use a wide angle lens for a portrait unless I wanted to include the background in the photo in a meaningful way. If you’re using a zoom lens you could use a shorter focal length to capture the entire subject but on the other hand it’s best to zoom to the longest focal length and step back. Of course you have to be practical about how far you can step back. The photo above was taken at 200mm and I was quite a ways back. This allowed me to isolate the subject from the background and it created the illusion that the background was a lot closer to the subject than it really was.
Think about how you will frame your subject within the photo. I really only believe in cropping in camera and not in post processing. If I have to crop after the fact it usually means I wasn’t close enough to my subject, I didn’t pay attention to distracting elements in the photo and/or I didn’t have the right lens. When you crop an image you are reducing the image quality but that’s not the worse part for me, when you crop you are changing the aspect ratio for the photo. If you wanted to print a photo then you may have to crop again to regain the proper aspect ratio. Plus why throw away part of your image?
Observing what’s in your frame goes hand in hand with this also. Make sure you don’t have a pole or a tree growing out of your subjects head. If you see something distracting such as garbage, branches and things that you can remove. Remove it! Nothing beats cloning something out in real life.
Sharpness and focus. This one is really big for me. Sharpness is crucial for me and I go through great lengths to make sure I produce sharp photos.
- I make sure I use a fast enough shutter speed. I try to make sure that my shutter speed is equivalent or faster than my focal length but that’s not always possible.
- Turn on Vibration Reduction if the lens has it.
- Before taking a photo I exhale then hold my breath. This reduces the amount of sway that you introduce.
- Use back button focus. When you use the shutter release button to focus and take the photo you tend to push harder on the button, this in turn moves the camera. Instead roll your finger onto the shutter release button. This also separates the Vibration Reduction functionality from focusing.
- Use a sharp lens.
- Use a tripod if you can, even for portraits.
For focus I make it a point to focus on the subjects eyes or the nearest eye to me. Nothing ruins a portrait faster than out of focus eyes and/or face. Furthermore choosing the correct aperture to determine how much of your photo is in focus is also key. A smaller aperture, larger number, will have more in focus and a larger aperture, a smaller number, will have less in focus.
Think about how will you light your subject. Will you use ambient light, mix ambient with strobes or just use strobes? My favorite is to mix ambient with strobes. I prefer this method since:
- I can control how the lighting looks.
- I can control the direction of lighting
- I can use lower ISO settings when the light starts to dim.
- Sometimes with ambient light you just have certain shadows that you just can’t eliminate,.
- You can create soft light at will with a strobe and a modifier.
From the example portrait above I mixed ambient with a strobe. I metered using a handheld light meter. This allowed me to control two zones of lighting. The light on the subject which was lit by the strobe and the background which was lit by the ambient sunlight. To get flattering light I used a modifier which was a 60″ umbrella. With light modifiers the bigger it is and the closer it is, the softer the light will be and the faster the light will fall off.
Find the right moment by paying attention to your subject. Instead of taking many spray and pray photos why not just focus on a few keys moments and nail those instead. When you take a lot of unnecessary photos you have to cull a lot which wastes time.
In conclusion, when you bring everything together, which can seem like a lot, you get a much better starting point. When you bring the photo into your image editor you are enhancing your image instead of fixing your image. The portrait above is straight out of the camera with no edits except adding a watermark. If I were to enhance the portrait I would remove any blemishes that were on the subject’s skin.

Comment (1)
Oh my gosh! What an absolutely beautiful photograph!